BOOT CAMP 2026 MENU
Add Photos
Open 'Add Model' Form
  1. Select “My Models” in the upper right.
  2. Select the “Add Model” button.
NEW: If you can see the "Add Model" button in the top menu, you can use that button instead of Steps 1 and 2.
Create New Model Form - Part 1
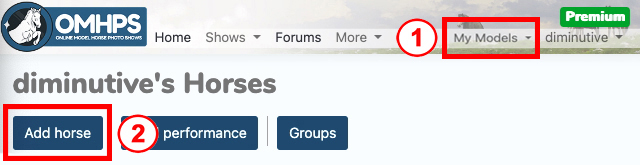
When you tap the "Add Model" button, you begin work in the Horse tab.
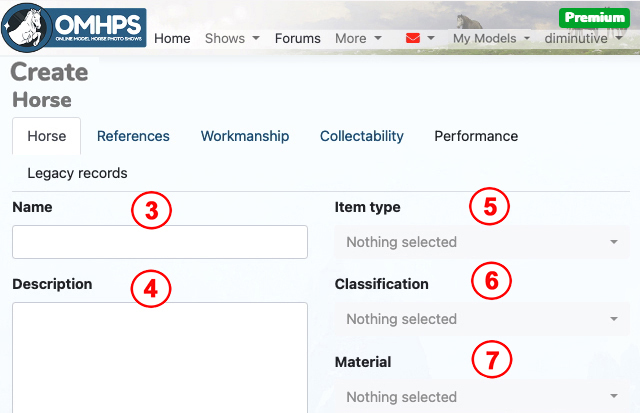
  1. Enter your model’s Name. Please *do not use Breyer's name for the model;* this makes stewarding hard.
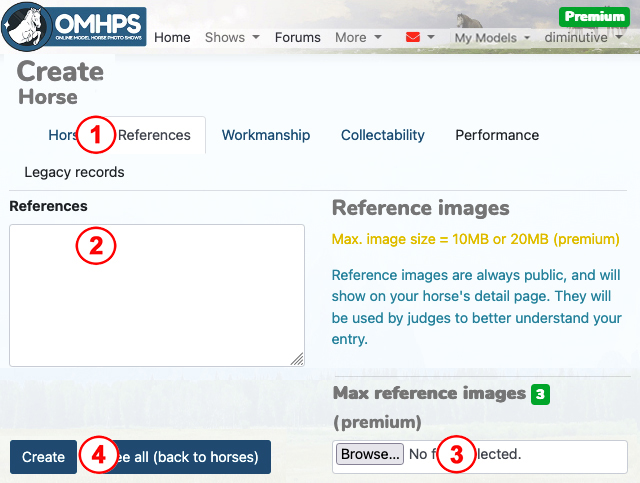
  2. Enter a Description for your model.
    • For all OF models, identify the edition name (Breyer’s name for the run, such as "Lafayette").
    • For OF collectibility entries, include the mold name (e.g., "Hamilton"). You can also use this area to write in any required collectibility info not identified in the drop-down menus.
    • For CM models, identify the mold used (e.g., Alborozo).
    • If your horse's color is hard to identify, you may also want to identify it here, especially if it is Rare, Historical or Restricted. (note: judges cannot see Workmanship tab info).
    • DO NOT add any info that may identify you as the owner.
  3. Select Item type. Pick Equid Figurine (Horse) for horses/longears and Other Animal Figurine for other animals.
  4. Select Classification. For original finish Breyer, select Original Finish Plastic. For original finish CollectA, select Original Finish Rubber/PVC. For customs, select Custom.
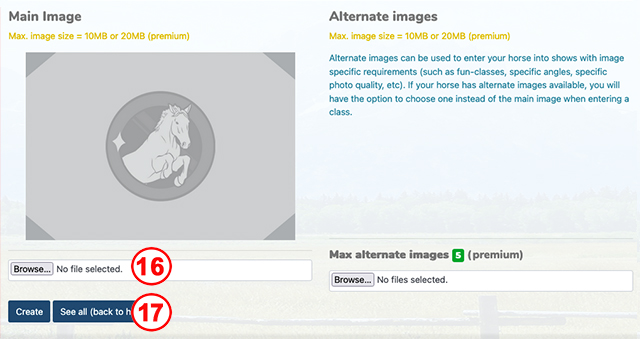
  5. Select Material. For Breyer, select Plastic and for CollectA, select Rubber/PVC.
Create New Model Form - Part 2
  1. Leave the privacy setting on Public.
  2. Select your model’s Manufacturer. Select Breyer or CollectA. For customs, select the manufacturer of the original body, either Breyer or CollectA.
  3. Select your model’s breed. If you intend to enter a horse in any of the Deco/Woodgrain classes, choose "Decorator" as the breed.
    NOTE: If you do not mark your decorator's breed as "Decorator," you will be guided by the site to enter it into the wrong class and if the problem is discovered after entries close, it cannot be fixed.
    NOTE: Do not use "Feral" or simply "Grade" ("Grade Light," etc. is just fine).
  4. If your model is a crossbred, select the additional breeds that make up the cross here. If your model is purebred, do not fill out this field.
Create New Model Form - Part 3
  1. Select your model’s Size (scale). Regular CollectA is 1:18. Deluxe CollectA is 1:12.
  2. Select your model’s Run type. Use Identify Your Breyer (IDYB) if you are unsure.
  3. Select the Number made.
    • If your model is a regular run or any other run where the number made is unknown, select Unknown.
    • For runs where the release was split into different colors, mane/tail variations, or finishes, select the number appropriate to your specific color/variation/finish combination (e.g., a holiday model with 1000 released and split evenly among 4 colors would select the 101-300 bracket, since 250 were made of each color).
    • For models where you could choose the finish/variation (e.g., Premier Club choice of glossy or matte), select the total number of the run if known, or select Unknown.
  4. Select your model’s Gender.
Create New Model Form - Part 4
  1. Select your model’s Main Image, the photo to be judged in breed and/or collectibility. If you want your photo uploading to go more quickly, resize your photos so they are no more than 1200 pixels wide and 600 pixels tall. There is an "alternate images" area for you to store different photos of your model (not documentation).
  2. Click Create to save your model. You may have to complete a Captcha, and depending on photo size and internet speed, it may take time for your model to upload.
Add Years Made Info
  1. Open your model’s page and click the bottom left My horse options button. Select "Edit."
  2. Navigate to the Collectability tab.
  3. Pick the Year introduced from the drop-down menu. Please note that we plan to use the year the run was introduced to determine where your model goes and suggest classes to you, unless the model can be dated to a more specific time. If that is the case, then please set the years made to the correct ones for your specific model.
  4. Pick the Year retired from the drop-down menu.
  5. Select Update to save your changes.
Add Halter Documentation
Open your model’s page and click the bottom left "My horse options" button. Select the "Edit" option.
  1. Click the References tab.
  2. Fill out the References field with any breed or color text information necessary for your halter model. See the documentation page for necessary info. You may also include links to your own documentation or third party websites. Important: Please be aware that judges will not have time to read more than 100 words of material and judges will not review entire webpages to try to find relevant material.
  3. Add up to three halter Reference Images (documentation) using the "Browse" or "Choose Files" button. This feature will not be available until your Premium OMHPS membership is enabled. See the documentation page for suggestions on when to use halter reference images. This feature can also be used to upload photos of certificates of authenticity.
  4. Click the Update button to save your changes.
Add Performance
Open your model’s page and click the bottom left "My horse options" button. Select the "Performances" option. Then select the "Add New" button.
This will send you to the Performance tab.
  1. Select the performance discipline that your horse is executing in the desired image.
  2. You must add a Description of what your horse is doing in the Description field if your horse is entered in an Other Performance or Scene class, and you may provide further information here for other classes.
    • You may use the "Reference Images" area at the bottom to upload patterns or tests, and any other performance-related image documentation.
    • You may add links to your own documentation in the "References" area. You may also include links to your own documentation or third party websites. Important: Please be aware that judges will not have time to read more than 100 words of material and judges will not review entire webpages to try to find relevant material.
    • See the Performance classlist page and Documentation page for further information on performance documentation.
  3. Tap the "Browse" or "Choose Files" button to select your model's performance image from your computer.
  4. Complete the Captcha (a checkbox that tests to see if you are real person) and click the Create button to save your model's performance information.